Route Instructions
In this guide you will learn how to display a map, calculate routes between multiple points, and show detailed route instructions.
|
|||
Setup
Prerequisites
Build and Run
Start a terminal/command prompt and navigate to the route_instructions directory within the Flutter examples directory. This is the name of the example project.
Note - the gem_kit directory containing the Maps SDK for Flutter
should be in the plugins directory of the example, e.g.
example_pathname/plugins/gem_kit - see the environment setup guide above.
Run: flutter pub get
Configure the native parts:
First, verify that the ANDROID_SDK_ROOT environment variable
is set to the root path of your android SDK.
In android/build.gradle add the maven block as shown,
within the allprojects block, for both debug and release builds:
allprojects {
    repositories {
        google()
        mavenCentral()
        maven {
           url "${rootDir}/../plugins/gem_kit/android/build"
        }
    }
}
in android/app/build.gradle
within the android block, in the defaultConfig block,
the android SDK version minSdk must be set as shown below.
Additionally, for release builds, in android/app/build.gradle,
within the android block, add the buildTypes block as shown:
Replace example_pathname with the actual project pathname
android {
    defaultConfig {
        applicationId "com.magiclane.gem_kit.examples.example_pathname"
        minSdk 21
        targetSdk flutter.targetSdk
        versionCode flutterVersionCode.toInteger()
        versionName flutterVersionName
    }
    buildTypes {
        release {
            minifyEnabled false
            shrinkResources false

            // TODO: Add your own signing config for the release build.
            // Signing with the debug keys for now, so `flutter run --release` works.
            signingConfig signingConfigs.debug
        }
    }
}
Then run the project:
flutter run --debugorflutter run --release
How it Works
This example demonstrates the following key features:
Display step-by-step route instructions in a dedicated screen with turn-by-turn guidance, follow-road details, and distances.
|
|||

Import Necessary Packages
First, import the required packages in your Dart code.
import 'package:gem_kit/core.dart';
import 'package:gem_kit/map.dart';
import 'package:gem_kit/routing.dart';
import 'route_instructions_page.dart';
import 'utility.dart';
import 'package:flutter/material.dart' hide Route;
App entry and initialization
const projectApiToken = String.fromEnvironment('GEM_TOKEN');

void main() {
  runApp(const MyApp());
}
This code initializes the projectApiToken with the required authorization token and launches the app.
Build the Main Application
Define the main application widget, MyApp.
class MyApp extends StatelessWidget {
  const MyApp({super.key});

  @override
  Widget build(BuildContext context) {
    return const MaterialApp(
      debugShowCheckedModeBanner: false,
      title: 'Route Instructions',
      home: MyHomePage(),
    );
  }
}
Handle Maps and Routes in the Stateful Widget
|
|||
Create the stateful widget, MyHomePage, which will handle the map and routing functionality.
class MyHomePage extends StatefulWidget {
  const MyHomePage({super.key});

  @override
  State<MyHomePage> createState() => _MyHomePageState();
}
Define State Variables and Methods
Within _MyHomePageState, define the necessary state variables and methods to interact with the map and manage routes.
class _MyHomePageState extends State<MyHomePage> {
late GemMapController _mapController;
TaskHandler? _routingHandler;
bool _areRoutesBuilt = false;
List<RouteInstruction>? instructions;
@override
void dispose() {
GemKit.release();
super.dispose();
}
@override
Widget build(BuildContext context) {
return Scaffold(
appBar: AppBar(
backgroundColor: Colors.deepPurple[900],
title: const Text("Route Instructions",
style: TextStyle(color: Colors.white)),
actions: [
if (_areRoutesBuilt)
IconButton(
onPressed: _onRouteCancelButtonPressed,
icon: const Icon(Icons.cancel, color: Colors.white),
),
if (!_areRoutesBuilt)
IconButton(
onPressed: () => _onBuildRouteButtonRoute(context),
icon: const Icon(Icons.route, color: Colors.white),
),
],
leading: Row(
children: [
if (_areRoutesBuilt)
IconButton(
onPressed: _onRouteInstructionsButtonPressed,
icon: const Icon(Icons.density_medium_sharp, color: Colors.white),
),
],
),
),
body: GemMap(onMapCreated: _onMapCreated, appAuthorization: projectApiToken),
);
}
void _onMapCreated(GemMapController controller) {
_mapController = controller;
}
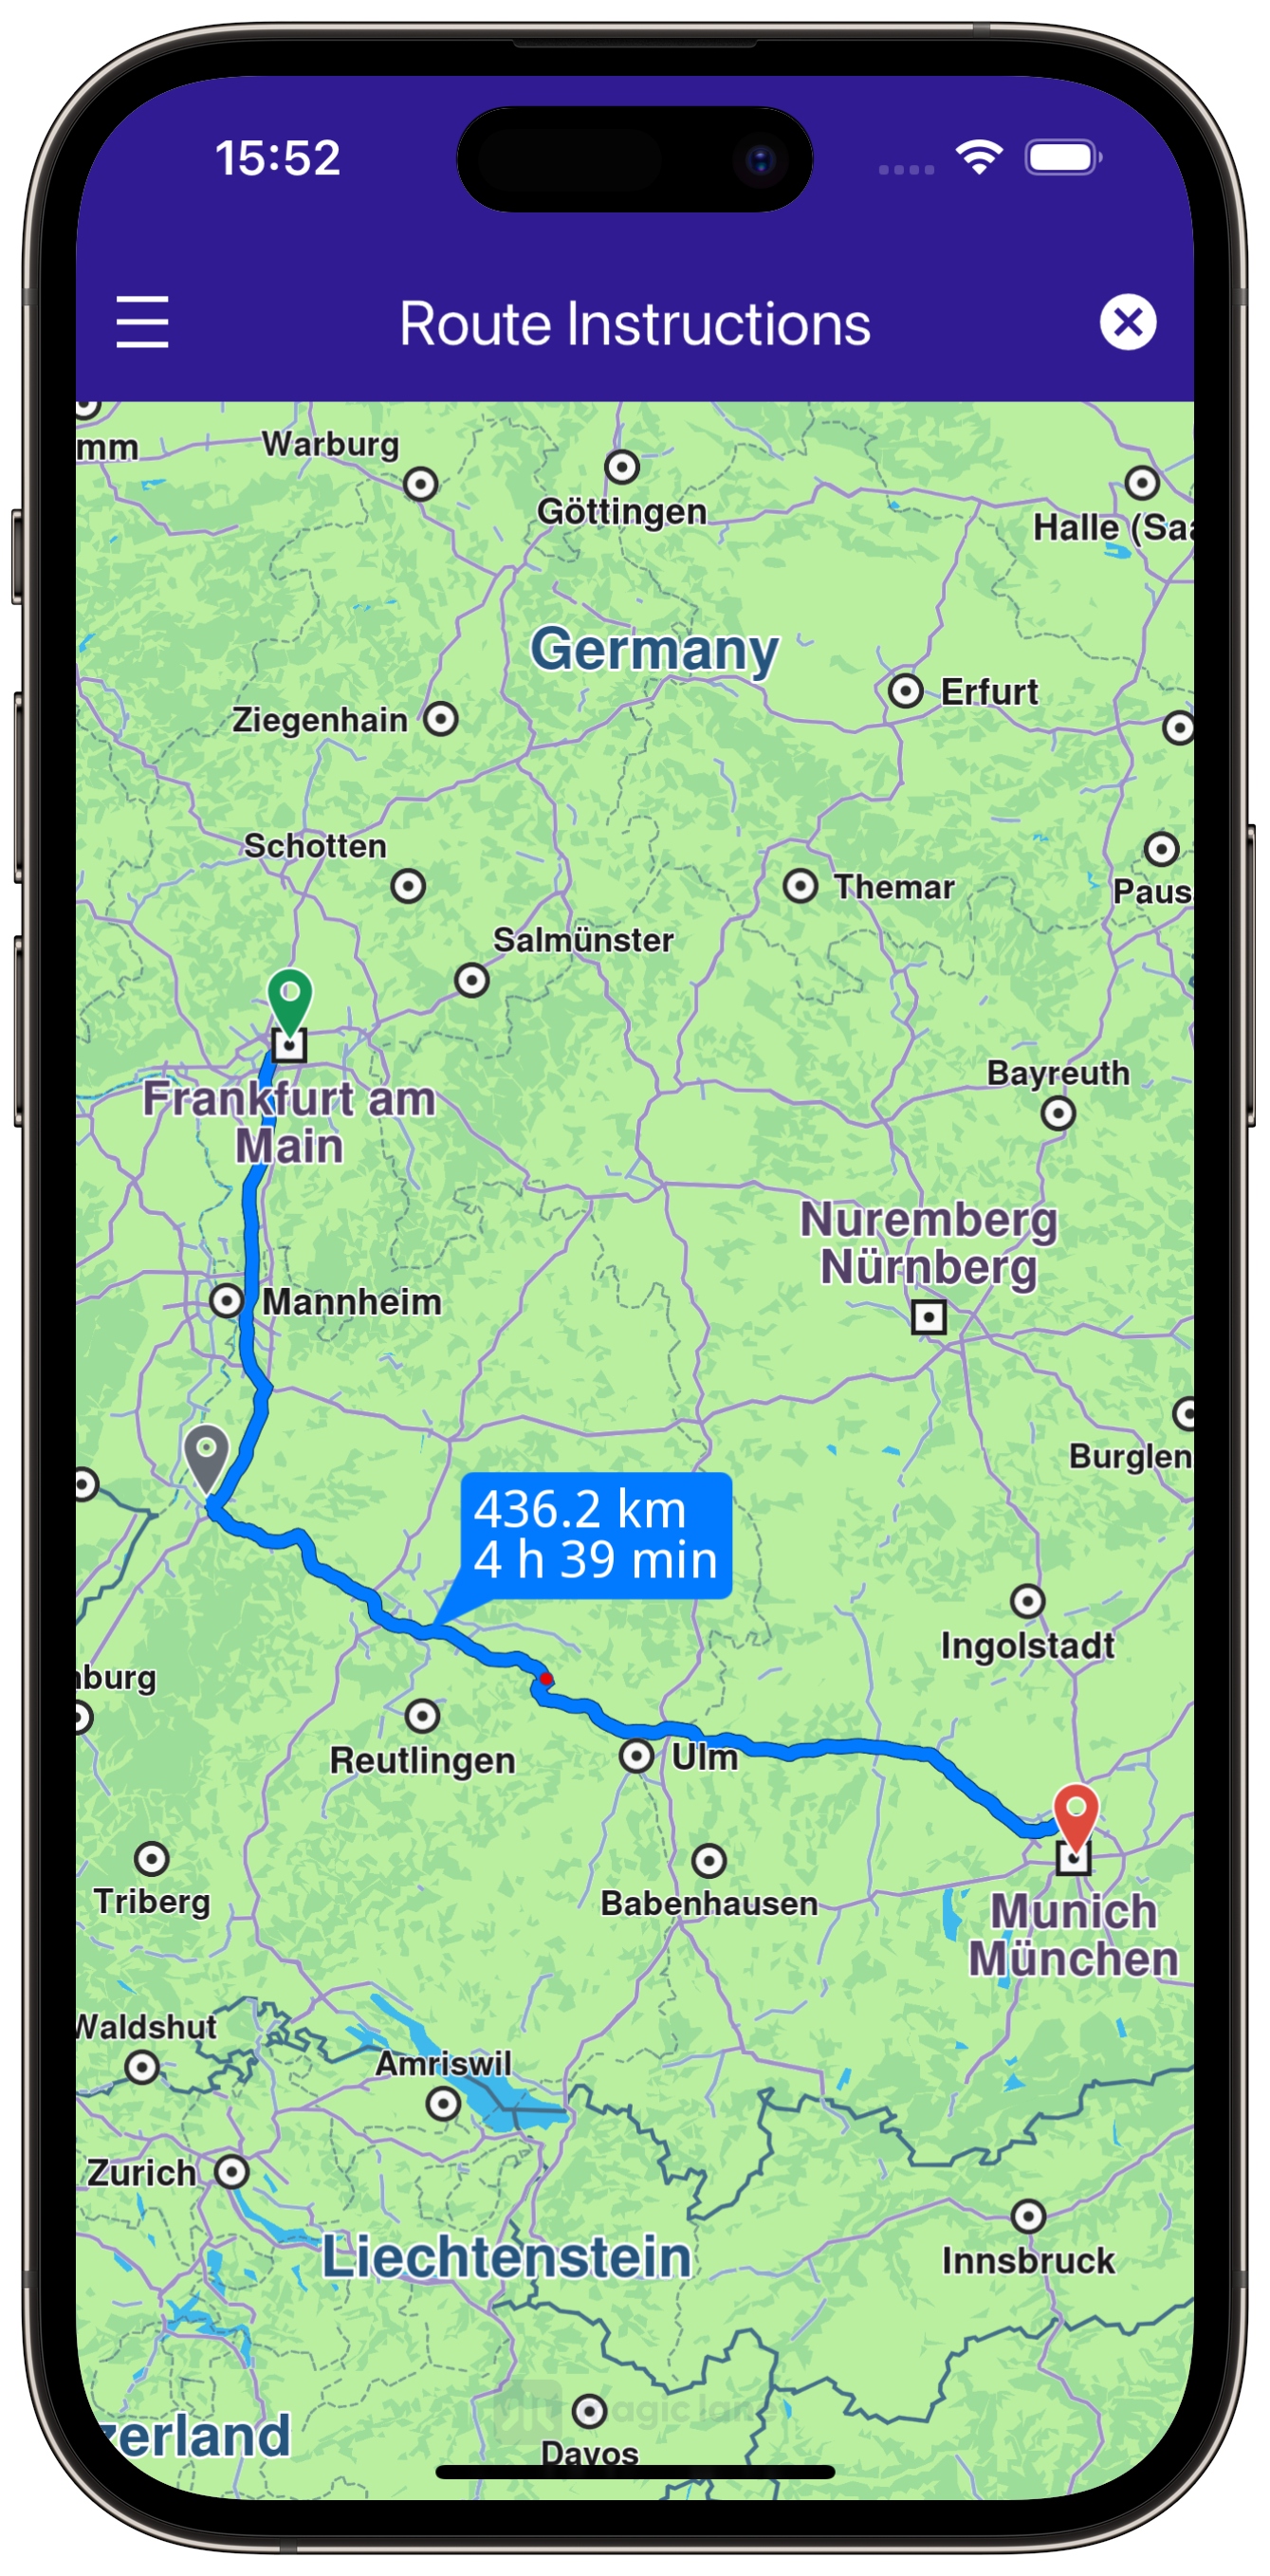
void _onBuildRouteButtonRoute(BuildContext context) {
final departureLandmark =
Landmark.withLatLng(latitude: 50.11428, longitude: 8.68133);
final intermediaryPointLandmark =
Landmark.withLatLng(latitude: 49.0069, longitude: 8.4037);
final destinationLandmark =
Landmark.withLatLng(latitude: 48.1351, longitude: 11.5820);
final routePreferences = RoutePreferences();
_showSnackBar(context, message: 'The route is calculating.');
_routingHandler = RoutingService.calculateRoute(
[departureLandmark, intermediaryPointLandmark, destinationLandmark],
routePreferences, (err, routes) async {
_routingHandler = null;
ScaffoldMessenger.of(context).clearSnackBars();
if (err == GemError.success) {
final routesMap = _mapController.preferences.routes;
for (final route in routes!) {
routesMap.add(route, route == routes.first,
label: route.getMapLabel());
}
_mapController.centerOnRoutes(routes);
instructions = _getInstructionsFromSegments(routes.first.segments);
setState(() {
_areRoutesBuilt = true;
});
}
});
}
void _onRouteCancelButtonPressed() async {
_mapController.preferences.routes.clear();
if (_routingHandler != null) {
RoutingService.cancelRoute(_routingHandler!);
_routingHandler = null;
}
if (instructions != null) {
instructions!.clear();
}
setState(() {
_areRoutesBuilt = false;
});
}
void _onRouteInstructionsButtonPressed() {
Navigator.of(context).push(MaterialPageRoute<dynamic>(
builder: (context) =>
RouteInstructionsPage(instructionList: instructions!)));
}
List<RouteInstruction> _getInstructionsFromSegments(
List<RouteSegment> segments) {
List<RouteInstruction> instructionsList = [];
for (final segment in segments) {
final segmentInstructions = segment.instructions;
instructionsList.addAll(segmentInstructions);
}
return instructionsList;
}
void _showSnackBar(BuildContext context,
{required String message, Duration duration = const Duration(hours: 1)}) {
final snackBar = SnackBar(
content: Text(message),
duration: duration,
);
ScaffoldMessenger.of(context).showSnackBar(snackBar);
}
}
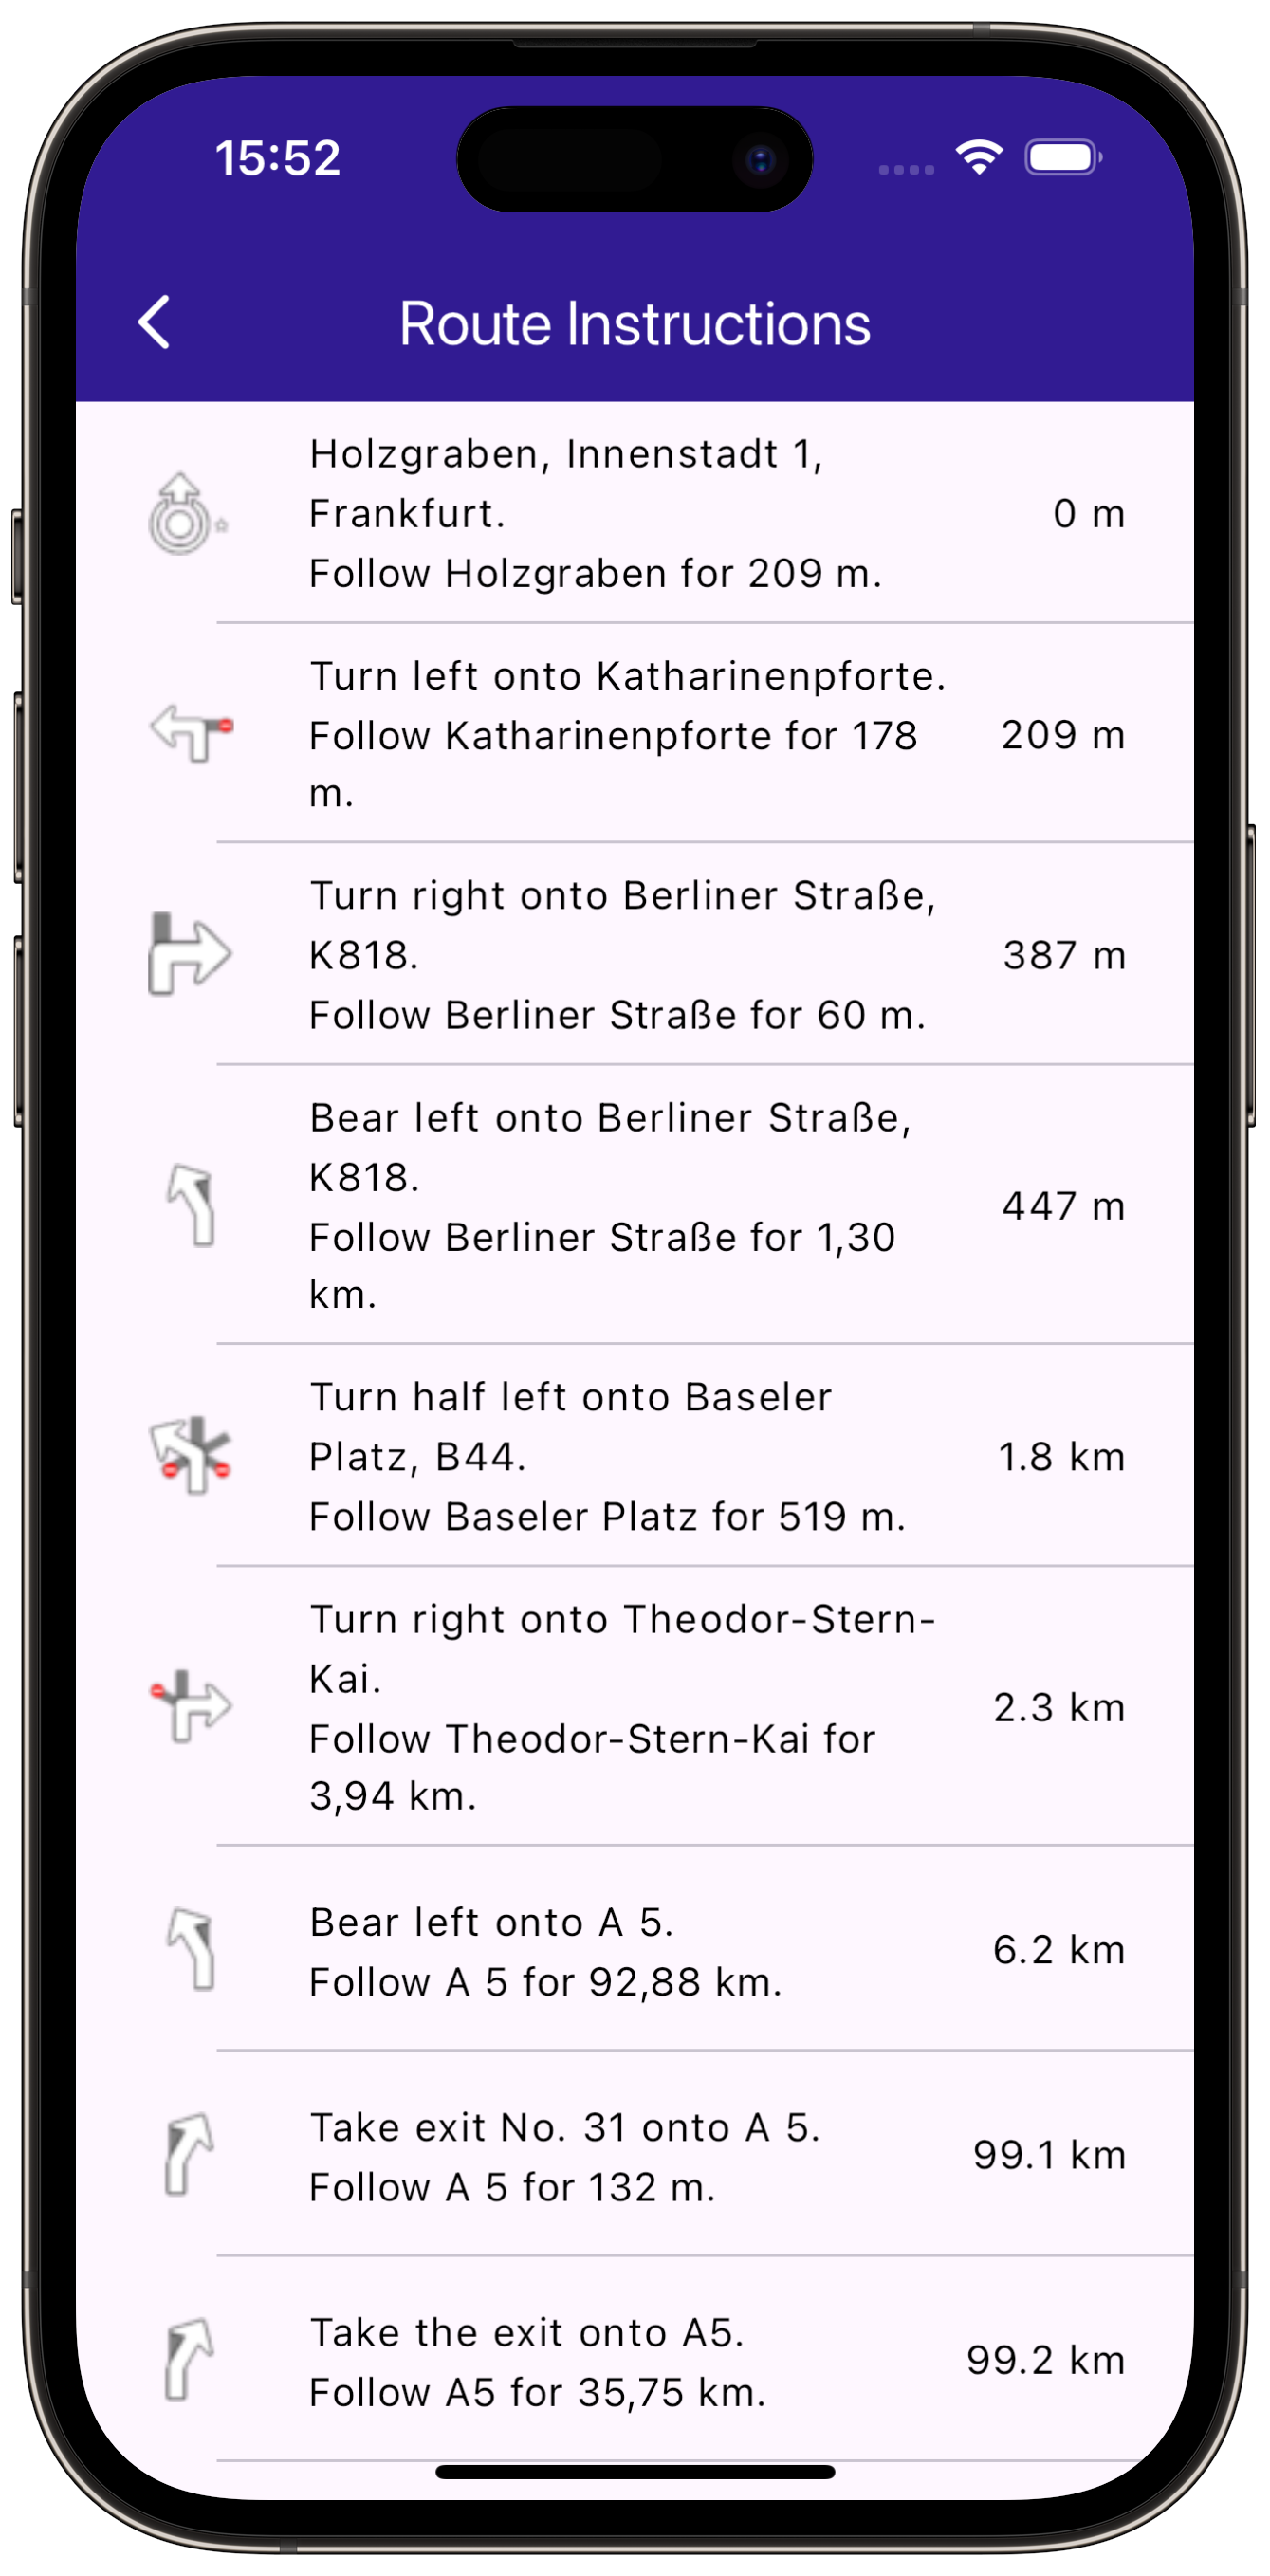
Route Instructions Page
The RouteInstructionsPage displays detailed route instructions. Here is the code for RouteInstructionsPage and the InstructionsItem widget.
import 'package:gem_kit/core.dart';
import 'utility.dart';
import 'package:flutter/material.dart';

class RouteInstructionsPage extends StatefulWidget {
  final List<RouteInstruction> instructionList;

  const RouteInstructionsPage({super.key, required this.instructionList});

  @override
  State<RouteInstructionsPage> createState() => _RouteInstructionsState();
}

class _RouteInstructionsState extends State<RouteInstructionsPage> {
  @override
  Widget build(BuildContext context) {
    return Scaffold(
      appBar: AppBar(
        automaticallyImplyLeading: true,
        title: const Text("Route Instructions", style: TextStyle(color: Colors.white)),
        backgroundColor: Colors.deepPurple[900],
        foregroundColor: Colors.white,
      ),
      body: ListView.separated(
        padding: EdgeInsets.zero,
        itemCount: widget.instructionList.length,
        separatorBuilder: (context, index) => const Divider(
          indent: 50,
          height: 0,
        ),
        itemBuilder: (contex, index) {
          final instruction = widget.instructionList.elementAt(index);
          return InstructionsItem(instruction: instruction);
        },
      ),
    );
  }
}

class InstructionsItem extends StatefulWidget {
  final RouteInstruction instruction;
  const InstructionsItem({super.key, required this.instruction});

  @override
  State<InstructionsItem> createState() => _InstructionsItemState();
}

class _InstructionsItemState extends State<InstructionsItem> {
  @override
  Widget build(BuildContext context) {
    return ListTile(
      leading: Container(
        padding: const EdgeInsets.all(8),
        width: 50,
        child: Image.memory(widget.instruction.turnDetails
            .getAbstractGeometryImage(renderSettings: const AbstractGeometryImageRenderSettings())),
      ),
      title: Text(
        widget.instruction.turnInstruction,
        overflow: TextOverflow.fade,
        style: const TextStyle(color: Colors.black, fontSize: 14, fontWeight: FontWeight.w400),
        maxLines: 2,
      ),
      subtitle: Text(
        widget.instruction.followRoadInstruction,
        overflow: TextOverflow.fade,
        style: const TextStyle(color: Colors.black, fontSize: 14, fontWeight: FontWeight.w400),
        maxLines: 2,
      ),
      trailing: Text(
        widget.instruction.getFormattedDistanceUntilInstruction(),
        overflow: TextOverflow.fade,
        style: const TextStyle(color: Colors.black, fontSize: 14, fontWeight: FontWeight.w400),
      ),
    );
  }
}
This example guides you through the setup and implementation of route instructions in a Flutter application using the ``gem_kit``package. The focus is on handling maps, user interactions, and route preferences to provide a seamless user experience for calculating and displaying route instructions.