Add Optimization with Full Details
The example covers the following features:
- Adding an optimization with custom configuration parameters.
- Defining orders with various fields (e.g., time windows, packages, weights).
- Setting up multiple vehicles with specific constraints.
- Displaying the optimized solution on a map.
When you run the example application:
- An optimization is created and saved.
- The optimized solution is returned and displayed on the map.
Create Customers and Orders
Each order must have a customer associated with it. You can either:
- Create a new customer and assign it to the order.
- Use an existing customer (refer to the Get Customer example).
Initializing and Adding Customers
- Initialize a
ProgressListenerandvrp::Service. - Create twelve
vrp::Customerobjects and set the desired fields, and add them to database. - Call the
addCustomer()method from thevrp::Serviceusing thevrp::CustomerandProgressListenerand wait for the operation to be done.
Initializing and adding Orders
- Create a
vrp::OrderListand add orders to it. Each order must have a customer associated with it - Create twelve
vrp::Ordersobjects and associate one customer for each, set the desired fields, and add them to database. - Call the
addOrder()method from thevrp::Serviceusing thevrp::OrderandProgressListenerand wait for the operation to be done.
Configure Optimization Parameters
Configuration Parameters define key settings that influence the behavior of the route optimization process. These settings determine aspects such as optimization goals, search time limits, and flexibility in handling orders.
- Create a
vrp::ConfigurationParametersobject and set the desired parameters. - Create a
gem::vrp::OrdersSequenceMapthis is not a mandatory field, specifies the association between different orders that should be visited in a certain order. In our example will be a fixed sequence of orders between orders from position 2,8,6.
Create Vehicles and difine Vehicle Constraints
Vehicle constraints define the limitations and requirements applied to a vehicle during the route optimization process. Ensure that the vehicle operates within its capabilities, such as time windows, capacity, distance, revenue. There are two ways of defining the constraints. Each vehicle will have a different contraints or we set only one vehicle constraints that will apply to all vehicles.
Initializing and adding vehicles
- Create a
gem::vrp::VehicleListand add vehicles to it. - Create two
vrp::Vehicleobjects and set the desired fields, and add them to database. - Call the
addVehicle()method from thevrp::Serviceusing thevrp::VehicleandProgressListenerand wait for the operation to be done.
gem::vrp::VehicleList vehicles;
gem::vrp::Vehicle vehicle1;
vehicle1.setName("Vehicle 1");
vehicle1.setType(gem::vrp::EVehicleType::VT_Car);
vehicle1.setStatus(gem::vrp::EVehicleStatus::VS_Available);
vehicle1.setManufacturer("Kia");
vehicle1.setModel("Ceed");
vehicle1.setFuelType(gem::vrp::EFuelType::FT_GasolinePremium);
vehicle1.setConsumption(6.5);
vehicle1.setLicensePlate("BV01ASD");
vehicle1.setMaxWeight(300);
vehicle1.setMaxCube(15);
vehicle1.setStartTime(420); // 7:00:00 AM
vehicle1.setEndTime(1860);  // 7:00:00 AM next day

int res = serv.addVehicle(&listener, vehicle1);
WAIT_UNTIL(std::bind(&ProgressListener::IsFinished, &listener), 5000);
vehicles.push_back(vehicle1);

gem::vrp::Vehicle vehicle2;
vehicle2.setName("Vehicle 2");
vehicle2.setType(gem::vrp::EVehicleType::VT_Car);
vehicle2.setStatus(gem::vrp::EVehicleStatus::VS_Available);
vehicle2.setManufacturer("Kia");
vehicle2.setModel("Ceed");
vehicle2.setFuelType(gem::vrp::EFuelType::FT_GasolinePremium);
vehicle2.setConsumption(6.5);
vehicle2.setLicensePlate("BV02ASD");
vehicle2.setMaxWeight(300);
vehicle2.setMaxCube(15);
vehicle2.setStartTime(480); // 8:00:00 AM
vehicle2.setEndTime(2520);  // 6:00:00 PM next day

res = serv.addVehicle(&listener, vehicle2);
WAIT_UNTIL(std::bind(&ProgressListener::IsFinished, &listener), 5000);
vehicles.push_back(vehicle2);
Define Vehicle Constraints
- Create a
vrp::VehicleConstraintsobject for each vehicle. - Add these constraints to a
vrp::VehicleConstraintsList.
Create the Departures and Destinations
Departures in define the starting points for vehicle routes. These locations serve as the origin of a route and can impact optimization by influencing travel distance and time. Destinations define the final stop for a vehicle route. These locations mark the endpoint of a route and play a key role in optimizing route efficiency.
Initializing deparures and destinations
- Create two
vrp::Departureobjects one for each vehicle. - Create a
vrp::Destinationobject, both vehicles will end their routes at the same destination.
Create the Optimization
An optimization represents a set of orders, vehicles, constraints, and other parameters that define a routing problem.
- Create a
vrp::Optimizationobject. - Assign the
OrderList,ConfigurationParameters,VehicleList,VehicleConstraintsList,Departures,Destinationsto the optimization.
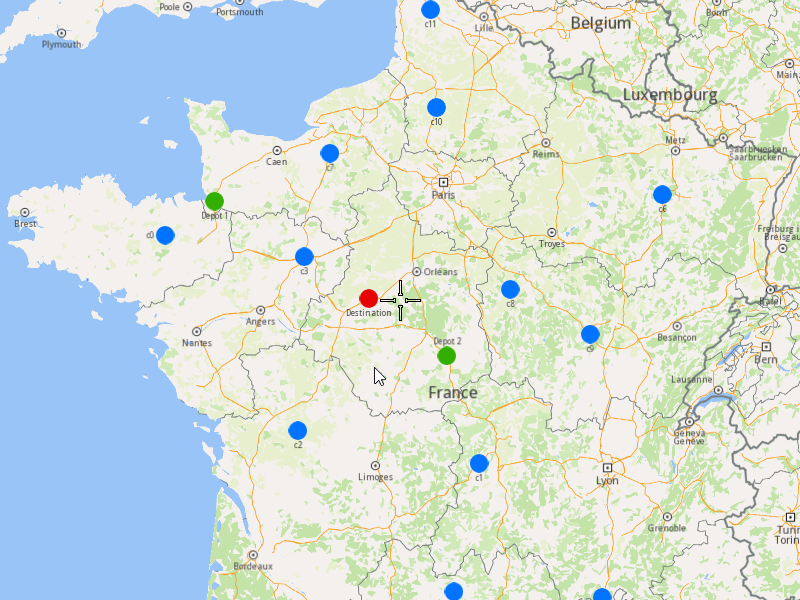
Displaying Orders on the Map
Once the orders have been added, we can display them on the map.
Initialize Map Components
Create a MapServiceListener, OpenGLContext, and MapView:
Highlight Orders and Departures
- Create a
LandmarkListandCoordinatesListusing theOrderList,DeparturesandDestinations. - Instruct the
MapViewto highlight the landmarks (orders, departures, and destinations) - For a better visibility create a
PolygonGeographicAreafrom theCoordinatesList, center theMapViewon this area.
Run the Optimization
- Call the
addOptimization()method fromvrp::Service, passing theOptimizationobject and theProgressListener. - After the operation is finished, a solution for optimization will be generated. To view the solution, you need to call the
getSolutionmethod from the optimization, which will return avrp::RouteListcontaining the optimization results.
Display Routes on map
Once the optimization is complete and a solution has been found, we can display the solution on the map
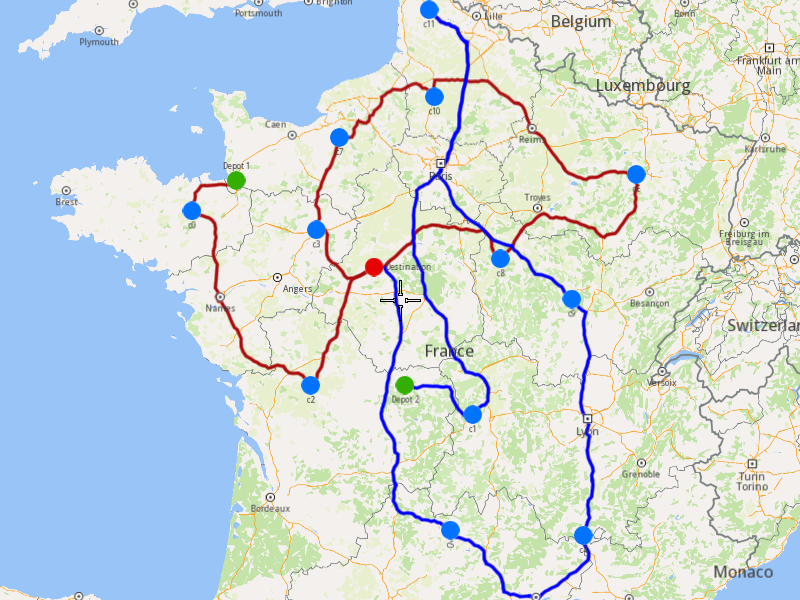
- Ensure that operation was done, and a solution was found.
- Create a
MarkerCollectionof typePolylinefor each route. - Add the route shapes to the
MarkerCollection. - Set the
MarkerCollectionin the map view preferences. - After hiliting on the map, center the screen over the routes.